Thursday, 9 May 2019

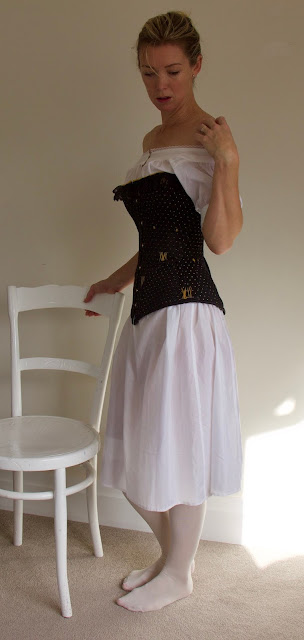
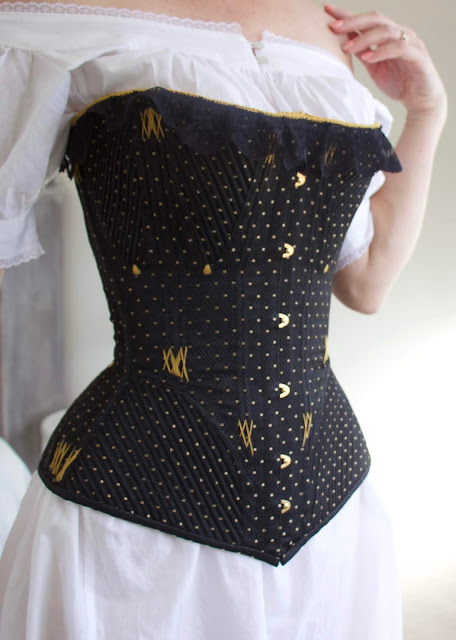
1875 Black Victorian Corset

Isn't she gorgeous?? I can't get over how beautiful the corsets of the mid-late Victorian era are. They have such amazing flossing, laces and trim. The craftsmanship of the stitching, albeit with machines at this stage, just delights me. And as usual, this admiration creates a desire to own a pair myself, and the experience the ins and outs of the actual making of one.

This was my inspiration:
1875 Symington corset in lasting, cotton and hessian
It has created such a beautiful geometric lattice of stitches, which is just lovely and takes a plain black fabric to a work of art.

I took the pattern for the Khaki Corded Corset from the Jill Salen book "Corsets", which is actually dated 1890-1900. However she herself says this corset is very similar to the above corset, and there is very little difference in the styling besides the hip gussets that I can see. It's like a combination/hybrid of the Khaki Corded and the Pretty Housemaid!

The stack of imported coutil was sitting there, calling, so this project was going to use a beautiful rich black brocade with gold spots bought from Vena Cava, UK. As I wanted the gold spots to feature, I used black thread to sew this up, rather than the gold/yellow thread featured above.  I started looking into which busks/eyelets etc I would need, and quickly realised that the only option was to Go Gold. I wanted a straight busk like the above, rather than a spoon busk, which fortunately came in gold, so ordered this, gold grommets, some steel boning and black lacing from Sew Curvy, UK

Cue impatient waiting.

In the meantime I could scan and print off the pattern from "Corsets". I am still struggling with figuring out easy ways to stretch patterns width and length ways to fit my sizing requirements, but in the meantime the old cut-and-stick works for adjusting sizing. 

Well, I thought it worked, but in the end my sizing was way off and I had to adjust seam allowances to accommodate. One day I'll figure it out. 

The pattern called for four bust gussets and four hip gussets, all fully corded. This was somewhat of a challenge as it takes a bit of guess work to account for shrinkage: I like to use the method of sewing the cording into the fabric, keeping the back fabric tight to ensure the bumps are on the outside for maximum visual impact. This work absolutely killed my neck and shoulders as it involved so many hours of closely watching stitches on the machine. An hour a night was all I could stand before the heat pack came out and that was me for the evening. 

Finally I was challenged to decide on flossing designs and so I used a gold top-stitching thread for great visibility, and a rather open design rather than a satin embroidery finish. I'm happy with it, though it certainly improved as I got further into the project. 

It was finished with a gold braid along the top and some black lace. The fit is great, and it looks and feels amazing. I do have wrinkling issues at the waist, and I know how I can improve that next time, but for now it is a great corset that will cover 1875-1900 quite happily. The measurements were about 34-25-35, none of which are my actual measurements but the style allowed me to add to bust and hip and take away from waist pretty easily. I'm looking forward to trying out some other of the Symington collection corsets over the next few years!


I am wearing an early Victorian chemise of lawn

(sorry about the blurriness) It laced up perfectly

The fit was very comfortable and supportive

Fitting the corded hip panels was rather tricky! 

Detail of the top edge

Shadbelly - what?

My 18-year old daughter has competed at dressage for years, and she asked me if I could make her a shadbelly. A what? you may ask. This is a dressage coat for those riders at higher levels. It has tails, it is double-breasted, with 'waistcoat' points, and it's based on the day coat worn by those super trendy men in the early-mid Victorian years.

My research brought up only one company selling ready-made patterns of these coats, Suitability, based in the US. I ordered this dressage and shad belly pattern and started my research into how to actually tailor.

As all I'd ever done was dressmaking, I thought the first step was an online course, so I purchased this jacket fitting course off Craftsy, which was fantastic. I know how to make toiles from my years of trial and error, but this course gave me some tried and true practices when fitting a toile, as well as confirmed some of the ways I'd figured out how to do things. The fitting process was ssslllllooooww as for some reason despite my commitment to making the jacket, my daughter never seemed to be around (or willing!) to stand for a fitting. It was very interesting adjusting the fit for her actually. I learned that she and I might look like clones, but our body shapes are entirely different. While I have to account for wide, straight shoulders for me, she has very sloping shoulders. While I add 1-2" to my length, hers needed reducing by 1". While my sleeve length never changes from the packet, hers needed cuffing at the maximum length possible. And yet we are the same height and wear the same size clothing. It teaches me how crucial toiles are for well-fitting tailored clothing.

Finally happy with the finished fit, I purchased another course, this time on modern jacket sewing techniques and took a trip to the fabric store. My daughter wanted to stray from the traditional colours of navy and yellow, and instead chose a colour scheme of grey and pink, which is a beautiful combination! The first fabric I chose was 100% wool, but I changed that to a wool/poly blend, as it is going to be getting lots of wear and tear in it's life, as well as downpours and horse-slobber, so I wanted something pretty hard-wearing. I lined it with a satin lining as the regular lining was just a bit too transparent. I was completely unfamiliar with the correct weights of fusible interfacing for jackets, but what I've used seems to work. I've decided I definitely need a new iron and ironing board. Suggestions welcome!

I'm pretty happy with the finished result. Yes, I did make one or two mistakes, and there are a few things I would do differently next time. Next time? When my daughter is riding Grand Prix, that is. The pattern was...ok, but not perfect. It seems to have completely omitted a couple of steps despite me reading, re-reading, re-re-reading to find it (how to complete the front and front facing waistline?), and I was definitely not happy with my working of the piped front - not one of my finest hours. However, it fits like a glove, it has all 20 buttons attached and all 14 button holes in working order, and most importantly, my daughter is happy with it. Tick.

Finished jacket

Finished jacket - tails

The tails are tacked open to sit properly when mounted

Yes, I should have tidied up the button holds - doh.

Points are in dusky pink silk dupion - scraps worth keeping!

I'm about 50% happy with piping. Next time...

The fit is suited for riding, but I'd consider subtle
padding next time, to fill the gap between bust
and shoulder.

I loved the seam lines. 
The first time using shoulder pads!
I can't wait to see it in a dressage test now!

Sunday, 10 March 2019

February Challenge: Linen/linens

Well, hello! My favourite fabric, especially when it's a lovely, hot summer!

Our beautiful botanic gardens here in Wellington, NZ turned 150 this February, and we celebrated with a Victoria picnic. Friends were happy to join me in costume at the event...and as usual, I had nothing to wear. I actually literally mean Nothing To Wear, as I have no Victorian clothing at all, beyond the chemise and corset I made last year - yet to blog about.