 |
| Satire of regency women's fashion |
Showing posts with label petticoat. Show all posts
Showing posts with label petticoat. Show all posts
Friday, 20 April 2018
A Regency Petticoat

Wednesday, 14 June 2017
Silk Taffeta Petticoat (and jacket shhh)
 |
| Fabrics...? |
Fabrics are another unknown piece of the puzzle. I knew the main differences between polyester and natural fibres, and that some are blends of the two. I didn't know much about what fabric were used for which by which class and so on. As was evident from the fact I made a robe a l'anglaise from linen. (The petticoat at least is Historically Accurate as linen petticoats are common)
I'm sure the women at my favourite fabric store (The Fabric Store, oddly enough) must have thought me very strange, moving back and forwards through their little shop and fingering dozens and dozens of different fabrics. It gave me quite a good idea of what kind of fabric actually feels like, and drapes like. In the process, I decided that silk is a ridiculous option for 18th century clothing, being so drapey and fine, and that silk taffeta is gorgeous and much better for the job. Since then, I have learned more about the different qualities of silk that were available: 17th-early 18th century silks were much thicker and stiffer, like our upholstery-quality silks (note that for the next time I visit my favourite upholstery fabric store - I know they have some silk curtain fabric at $50/m...) and that later in the 18th century, more like the 1870s, the silk became finer and more like the tissue-thin quality we find today. Also, I had not come across the fact that interlining is my friend, which of course changes the way that silk acts.
I have always loved stripes. Especially 3cm stripes. I found a short piece of a red self-stripe (if that's what its' called...must research that too...) in a floaty silk and decided it would make a perfect little jacket. I just pictured a vibrant red petticoat to go with it, and a silk-taffeta would be just the thing. 3m of this, a little red linen for lining and I was off home to find a pattern...
I decided to use the same little 1770s jacket pattern I had used in the past by JP Ryan (see my pattern review page). Probably a mistake as I hadn't been all that happy with the last one. In fact, this is probably the worst mistake a sewer can make: repeat the same mistakes instead of learning from them! The jacket is made up with modern bag-lining technique (another term I have to research to make sure I'm using correctly). The sleeves were sideways as I had matched seams instead of notches, nothing sat straight, and it was next to impossible to get on without getting a cramp in my neck. This, I found, is a common injury for getting into costume unaided!
I pulled out the sleeves, reset them, and it still doesn't fit properly. I'm embarrassed to even include the photo, but I guess that's what this blog it about...the process. So there's one or two below just to chuckle at. The whole thing was hand-sewn for some stupid reason, using a gorgeous red silk thread. What a waste of time...
As for the petticoat, what a joy. No pattern of course - I just do the same (18th c?) knife/box pleat combo each time. One thing I do need to figure out is the tying strategies. I do the whole tie-the-front-round-the-back-and-the-back-round-the-front thing. But I have 2 questions: How do you get it to stay tight when you're doing it yourself, and What do you do about the knot bulges? Put that onto the research list...
For some reason I had a picture of a wide flounce around the bottom of the petticoat. I used every single mm of fabric, figured out how much I actually needed to go around the circumference (don't ask me how I worked it out) and came up with a width that would use up the remaining fabric. Or maybe I worked out the width to cut it out, and then figured out what size box pleats I could make using that length of fabric... Nobody understands the mind of a historical sewer...I thought box-pleats seemed to be the thing to do (again, don't ask me why) and that a little flounce at the top would be about right. I hand sewed the whole thing, including the side seams, as it was so nice to use. The flounce was pinked top and bottom - first time pinking, and I'm sure it's addictive!
And finally I decided it was much too long and that pin tucks would be just the thing, so did three of these, also by hand. I just adore them, they are so sweet.
Below are the photos of the finished result. I'll slot the jacket photo in between in the hopes that no-one notices it.
 |
| Red silk taffeta petticoat |
 |
| jacket |
 |
| Flounce and pin tuck detail |
- Jacket silk 50cm $15
- Petticoat silk taffeta 3m $60
- Red linen 50cm $10
- Red silk thread $7
- TOTAL $92
Future notes:
- Rip apart the jacket.
- Learn how to mock up this jacket pattern properly, and how to set sleeves traditionally.
- Interline the silk.
- Just one or two minor points to learn from...
Saturday, 10 June 2017
Silk 18th Century Petticoat in Blush
 |
| My holiday morning coffee |
Queen sized bed on it's own folding base, side table, duvet and pillows. Gosh, even my favourite linen bolster pillow! Coffee, a good lantern and some books. You can't see the shag-pile rug or the gold LED light hanging above the bed.
I admit, we do take rather a lot camping. It's my husband's fault. He insists we take our horse float. It means that nothing needs to be tied down or water-proofed. You just chuck it in and shut the ramp. I've built a shelf that fits at the mid-height, leaving us twice as much storage area. Bikes and surfboards under, suitcases and bedding on top. The rug went in to protect a surfboard, and the rest...well, there was room...so why not?
Well, camping is all fun and games for the kids, but sometimes it gets a little boring for me. I had brought along with me a couple of big hard-backs of garments from the Met. Museum - just your average holiday reading. I was reading up on 18th century clothing and underwear. But the natural outcome was the desire to start creating. So I went in search of a fabric store.
In fact, there was a fabric store and I was able to purchase a couple of fabrics, a sprigged cotton which I intended to use on a Regency dress at some time, and a blush silk. Sure, it was only dupioni silk, but for all that purists say it's sub-standard and barely fit for lining, I like it. I love it's slubbiness and it's lustre. I'll say it's an under-petticoat, and just enjoy the fact I'm wearing a silk petticoat, should that ever actually happen. Highly unlikely. For now, it's an 18th century silk petticoat that just sits in my cupboard and looks pretty. :-)
 |
| First, stitch up side selvage seams, then stitch (running) 10" pocket openings. |
 |
| Pin up 1" knife pleats with large box pleat at centre front and inverted box at centre back. |
 |
| Cut waistband from self-fabric and pleat to match width, leaving SA at edge |
 |
| Sew waistband to pleats using backstitch |
 |
| Outside of waistband before whipped to inside |
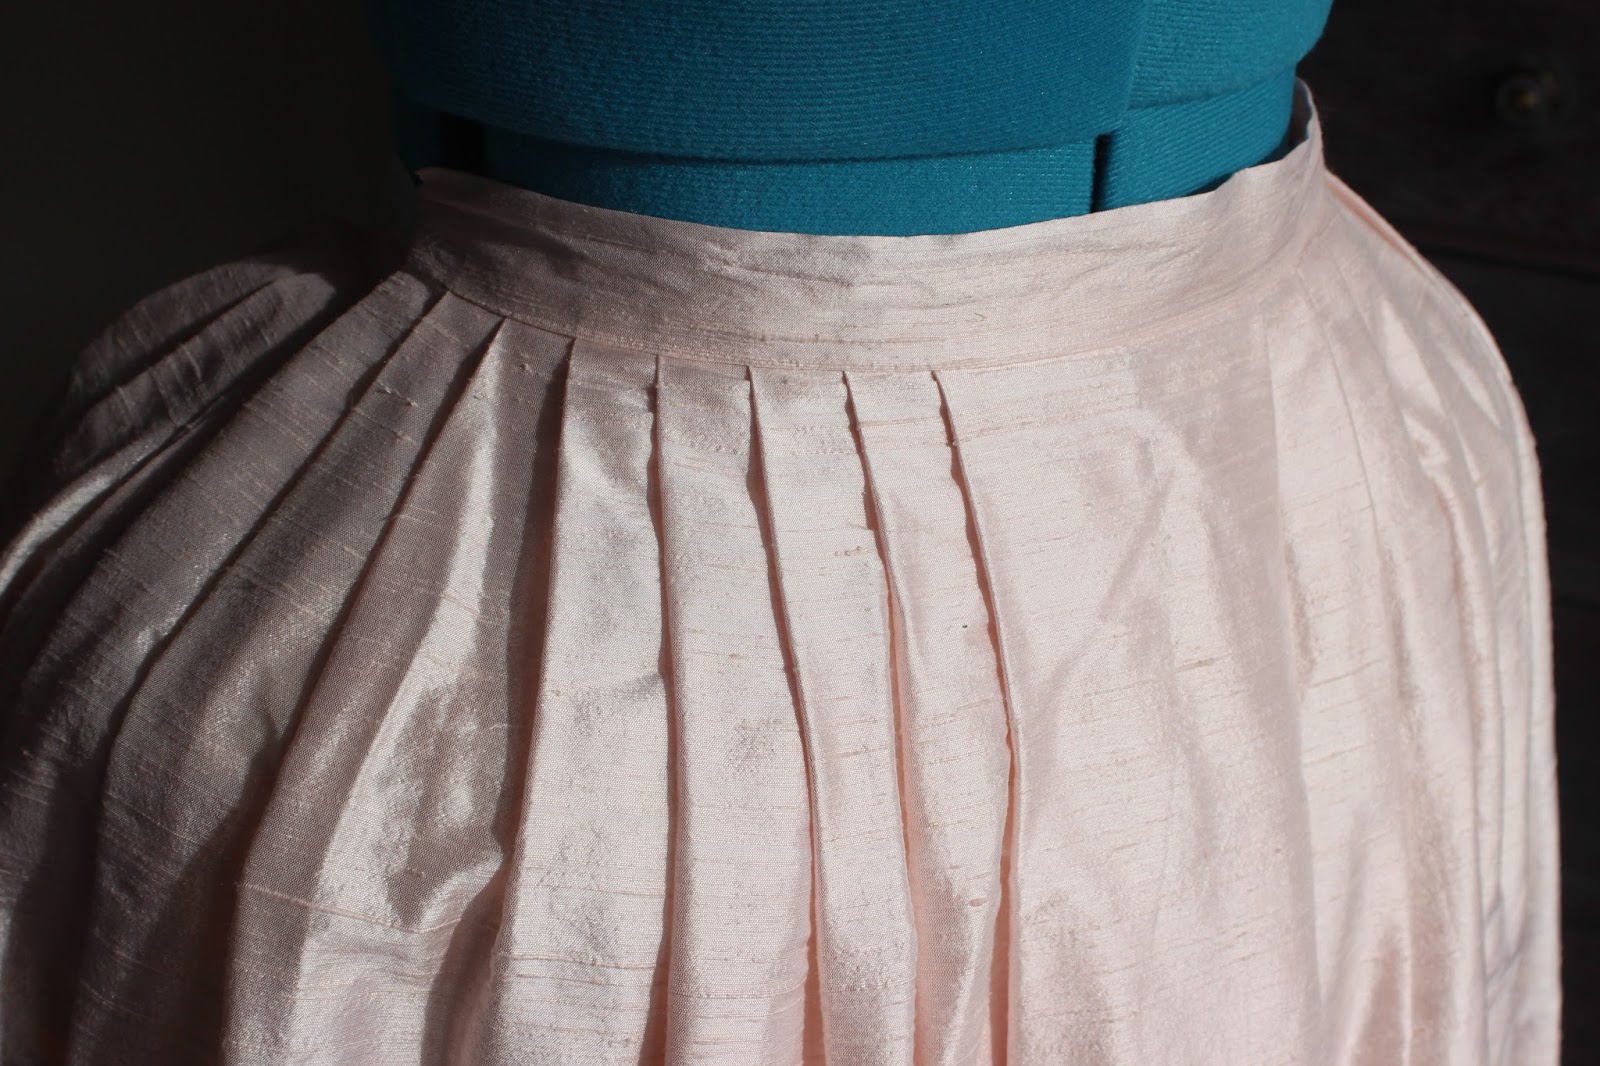 |
| Finished waistband on petticoat |
 |
| Bottom hemmed, tucks added by hand, and lace edging |
Yep, the lace is probably terrible. I'll have to have a look further into that: lace is certainly something we 21st century women know nothing about! My daughter (16) doesn't even know what it is. For now, it's staying. When it has an actual costume to compliment, I will find out what kind of lace is appropriate and I think it will require a whole post.
Tuesday, 2 May 2017
18th Century Accessorising
I have finally completed my first entire 18th century costume!
Gown - check
Underskirt - check
Stays - check
Bumroll - check
Shift - check
What more is there? Tick that one off and move onto the next period. Regency was it?
At this point I realised there were a few minor items still missing if I was going to go to the ball. (Who am I kidding - there is no ball!).
Namely...shoes...stockings...hat...kerchief...er...petticoats...probably jewellery of some description...
I really enjoyed looking into what else was required for the entire look. Several of the bloggers and websites at the bottom of my blog helped alert me to the possible dress deficiencies, bless.
PETTICOAT
The first item to make was a petticoat. I already had the official 'petticoat' as part of the Robe a l'Anglaise pattern. This is what they called underskirts, before the term became underwear, as far as I can tell.
I grabbed 3 metres of cotton lawn the next time I was in Spotlight. I had read that a thick under-petticoat topped with a thinner second petticoat gives a very nice outline (I should say silhouette - sounds more like I have a history with...well...history), and though my character is English and there is still a duty on imported cotton, somehow I decided I'd managed to get my hand on this lawn and made a petticoat.
I used the same pattern as the petticoat from the Larkin & Smith gown pattern - 1.5m x the desired length, sewn together a the sides leaving a 10" opening at pockets, knife-pleated the front towards pockets openings and the back towards the centre back. Pleats were about 1" wide, and whatever depth was required to reduce 3m of fabric to my 66cm waist. I made a self-waistband, sewed the pleated petticoat to it in the usual way and attached two cotton tape ties to each panel, each long enough to tie the front panel behind and the back panel in front.
Just to be clever, I decided that I was put the fabric sideways and have the selvages at the top and bottom. This was because the fabric was 120cm wide and I didn't want to have any more seams to sew than was necessary in order to have the suggested 3m hem. Unfortunately, once I wear the delicious bumroll, the petticoat is barely long enough and certainly not even of course with the extra width at hip and bum! I intend to remedy this with a nice deep ruffle at the hem at some point in the future. At that point I will photograph it for you, should you care to see it. And for future reference, sew the selvages at the sides.
KERCHIEF
The kerchief or fichu was the next thing on the agenda. To be perfectly honest, I have no issues whatsoever with showing plenty of décolletage, but there may be times when I don't want the sun on it. Or at least, my character wouldn't of course.
I decided that white linen was a good option, the cotton lawn being illegal and all at this period (or so some say). I hand sewed it in a triangle, probably not quite large enough in fact. Somehow I forgot my shapes and cut the triangle into two smaller triangles - no idea how - so it has a flat-felled seam down the centre! This doesn't matter at all though. The sides have a very narrow (1/4" total) hem, sewn with a running stitch with linen thread, which I had managed to find on a drive into the city.
It doesn't quite tuck into my stays tightly, so will require pinning I believe. I'll put that onto the (long) list of items to remake in more suitable dimensions.
STOCKINGS AND SHOES
I decided that I would splash out on some items from American Duchess. Their footwear is so incredible, and I'm not given to spending huge amounts on my own clothing or hobbies...or I wasn't until now anyway...so I managed to justify it to myself. Not enough to tell my husband about, so possibly not justified really...
I finally settled on this shoe: simply stunning. I further justified it by claiming I'd wear it with jeans as well, they looked so smart. I added some gorgeous buckles and silk stockings to the cart and felt very pleased with myself.
Once my box arrived after winging its way more than 13,000km to me, I was delighted. They look fabulous and just complete my costume nicely.
However, BETWEEN ordering and their arrival, I have to admit that the dollar conversion, shipping, along with our hideous duties on imported goods gave me rather a headache only remedied with several quick glasses of a strong red. Over NZ$500 those darlings ended up costing me. So I better damn well wear them!
HAT
Well, you've got me there. It seems that women wore caps. Or mobs. Especially married ones, as I definitely was. Back onto the web I went to find a cap pattern (see my pattern page).
The pattern was dated 1740 -1820, so seems to fit the period of my costume. I decided to make the Round Eared Cap, I think. It must be made with white linen, according to the pattern.
I don't know if I have a big head (my husband would probably say so!), but if I still had long hair, I've no idea how that cap would fit over my hair! Maybe I needed to make the cap with a larger back portion. Anyway, I learned the new skill of rolled hems and gathered rolled hems, both of which a really useful stitches to use, I've discovered.
Suffice to say, the cap looks ridiculous and you won't see a photo of me wearing it.
Ok, this is as much as you'll ever see. I hope it's extremely grainy.

Gown - check
Underskirt - check
Stays - check
Bumroll - check
Shift - check
What more is there? Tick that one off and move onto the next period. Regency was it?
At this point I realised there were a few minor items still missing if I was going to go to the ball. (Who am I kidding - there is no ball!).
Namely...shoes...stockings...hat...kerchief...er...petticoats...probably jewellery of some description...
I really enjoyed looking into what else was required for the entire look. Several of the bloggers and websites at the bottom of my blog helped alert me to the possible dress deficiencies, bless.
PETTICOAT
The first item to make was a petticoat. I already had the official 'petticoat' as part of the Robe a l'Anglaise pattern. This is what they called underskirts, before the term became underwear, as far as I can tell.
I grabbed 3 metres of cotton lawn the next time I was in Spotlight. I had read that a thick under-petticoat topped with a thinner second petticoat gives a very nice outline (I should say silhouette - sounds more like I have a history with...well...history), and though my character is English and there is still a duty on imported cotton, somehow I decided I'd managed to get my hand on this lawn and made a petticoat.
I used the same pattern as the petticoat from the Larkin & Smith gown pattern - 1.5m x the desired length, sewn together a the sides leaving a 10" opening at pockets, knife-pleated the front towards pockets openings and the back towards the centre back. Pleats were about 1" wide, and whatever depth was required to reduce 3m of fabric to my 66cm waist. I made a self-waistband, sewed the pleated petticoat to it in the usual way and attached two cotton tape ties to each panel, each long enough to tie the front panel behind and the back panel in front.
Just to be clever, I decided that I was put the fabric sideways and have the selvages at the top and bottom. This was because the fabric was 120cm wide and I didn't want to have any more seams to sew than was necessary in order to have the suggested 3m hem. Unfortunately, once I wear the delicious bumroll, the petticoat is barely long enough and certainly not even of course with the extra width at hip and bum! I intend to remedy this with a nice deep ruffle at the hem at some point in the future. At that point I will photograph it for you, should you care to see it. And for future reference, sew the selvages at the sides.
KERCHIEF
The kerchief or fichu was the next thing on the agenda. To be perfectly honest, I have no issues whatsoever with showing plenty of décolletage, but there may be times when I don't want the sun on it. Or at least, my character wouldn't of course.
I decided that white linen was a good option, the cotton lawn being illegal and all at this period (or so some say). I hand sewed it in a triangle, probably not quite large enough in fact. Somehow I forgot my shapes and cut the triangle into two smaller triangles - no idea how - so it has a flat-felled seam down the centre! This doesn't matter at all though. The sides have a very narrow (1/4" total) hem, sewn with a running stitch with linen thread, which I had managed to find on a drive into the city.
It doesn't quite tuck into my stays tightly, so will require pinning I believe. I'll put that onto the (long) list of items to remake in more suitable dimensions.
STOCKINGS AND SHOES
I decided that I would splash out on some items from American Duchess. Their footwear is so incredible, and I'm not given to spending huge amounts on my own clothing or hobbies...or I wasn't until now anyway...so I managed to justify it to myself. Not enough to tell my husband about, so possibly not justified really...
I finally settled on this shoe: simply stunning. I further justified it by claiming I'd wear it with jeans as well, they looked so smart. I added some gorgeous buckles and silk stockings to the cart and felt very pleased with myself.
Once my box arrived after winging its way more than 13,000km to me, I was delighted. They look fabulous and just complete my costume nicely.
 |
| Silk stockings...yum |
 |
| ...and Fraser shoes...how fabulous! |
However, BETWEEN ordering and their arrival, I have to admit that the dollar conversion, shipping, along with our hideous duties on imported goods gave me rather a headache only remedied with several quick glasses of a strong red. Over NZ$500 those darlings ended up costing me. So I better damn well wear them!
HAT
Well, you've got me there. It seems that women wore caps. Or mobs. Especially married ones, as I definitely was. Back onto the web I went to find a cap pattern (see my pattern page).
The pattern was dated 1740 -1820, so seems to fit the period of my costume. I decided to make the Round Eared Cap, I think. It must be made with white linen, according to the pattern.
I don't know if I have a big head (my husband would probably say so!), but if I still had long hair, I've no idea how that cap would fit over my hair! Maybe I needed to make the cap with a larger back portion. Anyway, I learned the new skill of rolled hems and gathered rolled hems, both of which a really useful stitches to use, I've discovered.
Suffice to say, the cap looks ridiculous and you won't see a photo of me wearing it.
Ok, this is as much as you'll ever see. I hope it's extremely grainy.
So my costume is now complete. I COULD make a pocket, but that just seems a bit practical. There's no need to go crazy now.
Subscribe to:
Posts (Atom)