Monday, 5 June 2017

A Blue Cotton 1770s Italian Gown

About this time I started watching Poldark.

Elizabeth from Poldark

Isn't it funny that thing that happens when you buy a new car. Suddenly it seems like every second car on the street is the same a yours. You start noticing them at every set of traffic lights!

This is what happened to me. Once I started historical sewing for real, I started taking notice of it all around me. Poldark, for example. In the first season, I watched it for the story and the scenery. In the second season, I watched it for the costumes.

Online again I went, this time to find a closed-front gown. These seem to be something that came more into fashion (at least amongst the gentry) later in the 18th century - more like 1780s. This time I found a really nice pattern company called Fig Leaf. I love the illustration first on the pattern, and then the fact that the pattern was taken from an extensive study of an extant gown for the use of a museum also gave me confidence. I try my best to do as much research as my limited resources allow prior to purchasing patterns, as it always costs so much to have them sent here. Its terribly disappointing to find out once it arrives that it's not authentic in its sewing techniques or pattern.

As I had several other things going on in my life right at that moment, the pattern stayed unopened for quite some time. However, browsing through...a local but nationwide store that I shall not name...I saw the perfect fabric and had to purchase it. It was an upholstery-weight cotton, in a pale sky blue, with a cream and beige floral and bird pattern on it. I had heard that cotton wasn't used until after this time due to laws, but I'd also read that no-one actually obeyed these laws anyway, so cotton was my new best friend. I purchased 9.5 metres of it, and this sat in glorious righteousness in my sewing corner for a couple of months until I felt I could justify starting a new project.

Isn't it always the way? I gleefully got out the pattern, cut it out, started working out my mock-up pieces to cut out on my calico...and found that I had 2 of one pattern sheet, and none of another. It happened to be the one with about 6 pieces on it! Grind to a halt.

I frantically emailed the company, and they were very quick to reply and print off the correct page and send it to me. Phew! It had cost me $51 plus shipping to get it here so I was a bit concerned! Restart.

I am disappointed to say, I didn't take any during photos. I don't know why, but I guess we all do it. I'm terrible and have to have the background uncluttered and neat, with no kids schoolbags and unwashed dishes to be seen, so photographing isn't always straightforward!

I am pretty proud of my pattern matching. 

Pinked sleeve trim: used no fray check...

Pinked neck trim: used fray check. Lesson learned!

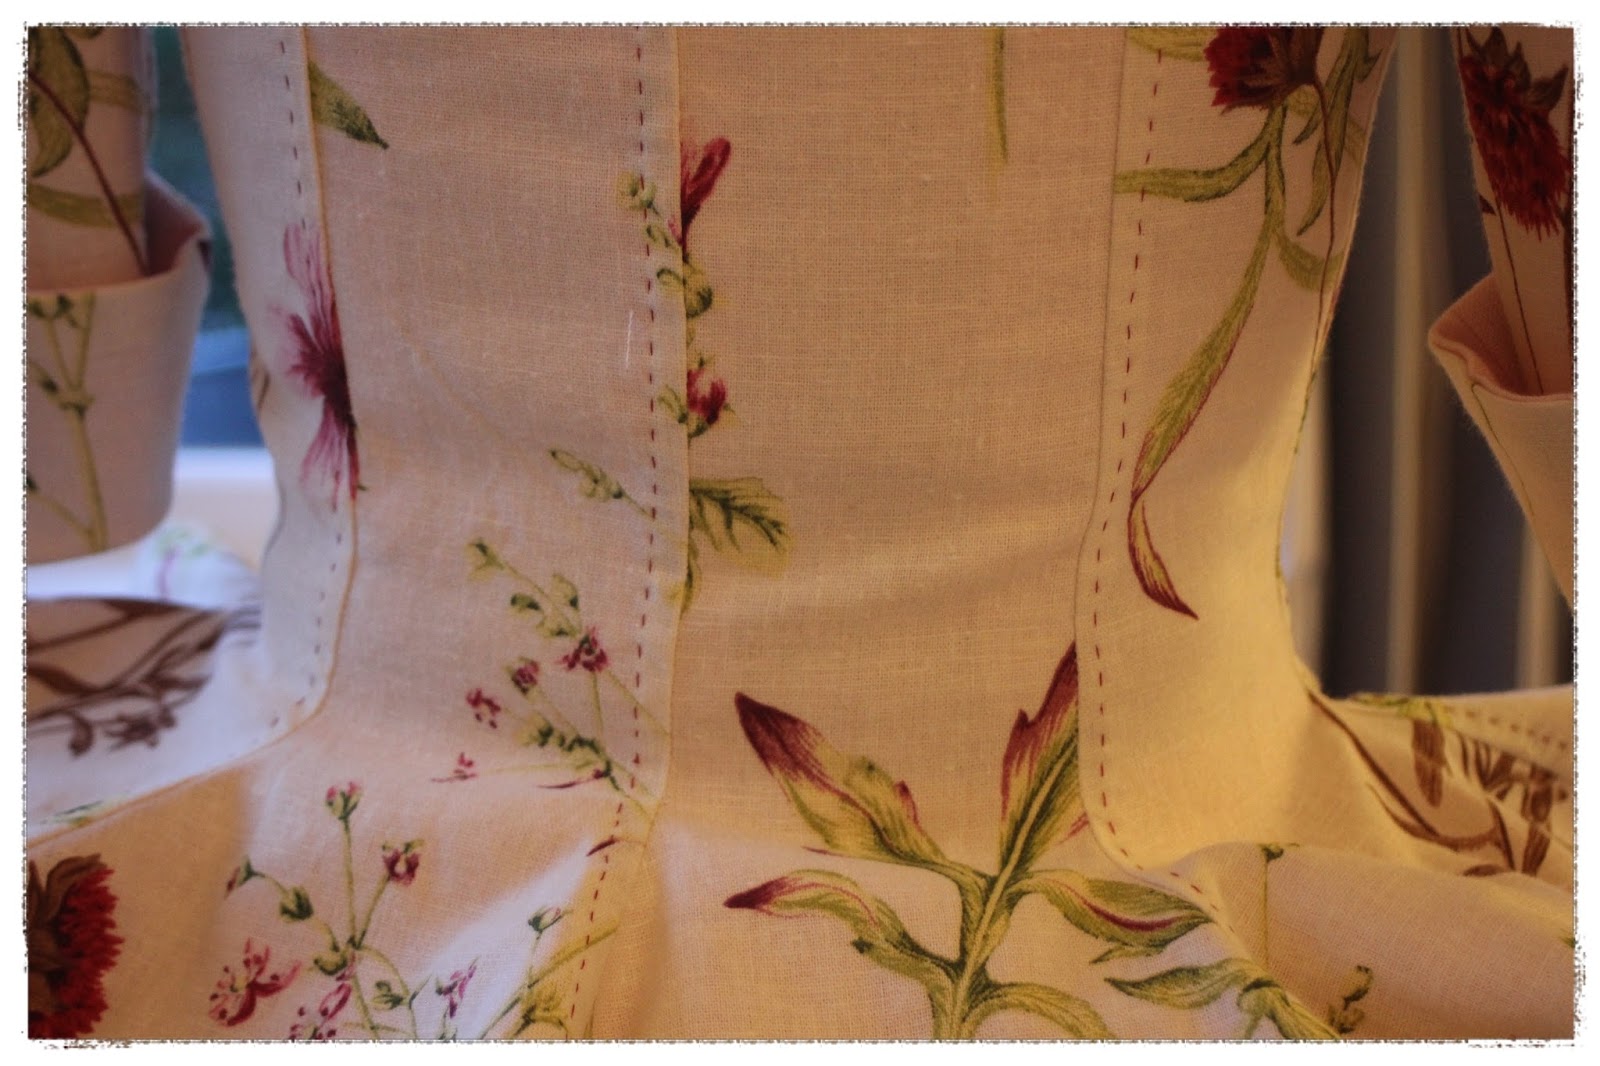
Centre back pleats. Boned and stab stitched. Love that back.

Inside centre back. Pattern designer suggested alternate finish
but I like the tidiness of how I whipped the lining down afterwards.

Hook and eye closure. No, not brass, but nearly correct.

Back neck. And sleeve seams are not finished, which is correct.

There is a LOT of fabric in the petticoat: 4.5m from memory.
Very heavy!

I've reviewed the pattern, and for the most part it was excellent. I think the first pattern I used helped me understand the process, and next time I use the pattern, I will use some of the more accurate techniques that are described throughout the pattern as an option.

The fabric was very heavy, though the pattern author assures me that it is more accurate to use this weight. Elsewhere I have read that the silks became more and more refined, so that by this stage (1780) they were the feather-weight silk that we see mostly today. I think a good compromise would be an upholstery-weight silk, and I have my eye on some for the next time I sew this particular gown.

For this, the 'practice' round, I sewed the long, main seams with machine. This was the dress that wore my fingers completely out, and I finally had to learn to use the thimble. I read that thimbles are a main item in a seamstress's kit, and I now well-believe it. It's not fun when the thread end of the needle pierces your finger repeatedly!!

Final fitting

Here is a very poor photo of the dress. I will take the next available opportunity to get all the sewing details pictured and uploaded, as it's such a special garment to me. And I love the 'polonaise' style of skirt, though I believe it's not just the skirt-style that makes an authentic polonaise, but the sort of inverted centre front opening which is wider at the waist and meets at the chest. Pointless information, but I'm sure will be useful at some point!

nb I now know this is an Italian gown, worn retroussee (puffed).

Just for interest's sake:

  • Pattern $60.00 including shipping 
  • 5m cotton for gown (I actually only used 3.5m @ 150cm wide) $105
  • 4.5m cotton for petticoat (I actually only used 3.6m, for an ultra-full petticoat!) $94.50
  • 1m lining $27.00
  • Fitting muslin $3.00
  • Cotton thread $5.00
  • Plastic boning $2.00
  • Hooks and Eyes $3.00
Total $300.00 (I'd rather not have known this)

A Curtain Carico Jacket

What girl can resist ordering that extra item when you buy online? I mean, you've already got to pay shipping for one item, why not just throw in that other that you just loved the look of?

I was guilty of this when I purchased my first pattern. Twice over, actually, as I believe I bought three patterns at the same time. The first two I have already shared with you: the stays and the Robe a l'Anglaise. The third pattern I purchased was J.P. Ryan's A Fine Collection of 18th Century Jackets for undress wear. It sounded so special with a name like that that I had to have it!

I made View B, which was described: "has a long, full skirt, open front, stomacher and cuffed sleeves, as worn in the 1760s." I will review it on my Pattern Review page.


The fitting muslin I made up didn't seem to need many adjustments besides the usual lengthening of the front/side/back by 3.5cm. In the end, the fit of the final jacket isn't quite right anyway - almost too snug under arms - and so perhaps I needed to make further adjustments, however perhaps the lack of fit is in fact just how an 18th century garment fits. I have read that a woman's posture at this time was to have shoulder blades virtually touching and that is certainly not how we normally stand these days. Also, sleeves fitted snugly under your arms anyway in the 18th century. These days we have plenty of room for moving as we do, well, move. The fit perhaps of a woman's clothing destined for life on a farm or laundry room might have a slightly different cut. In fact, from what I read, many women involved in these active and energetic chores would just strip off their gown and do the work in stays and petticoat. Sounds sensible to me!

I had recently made curtains for my living room, a lovely creamy linen in a bright burgundy and green floral pattern. I decided to use this for the main fabric of the jacket, and line it with the left-over pink linen from my English gown. The inside of the burgundy flower on the main fabric is just the same shade of pink as the linen, so my artistic side was quite pleased with the result. I planned to pair it up with the pink linen petticoat that I had made for the English gown, and there's nothing that my eye enjoys more than looking at colours that match! As there were limited off-cuts of the floral linen, I decided to cut the jacket to the shorter basque cutting line, possibly more suitable to the 1770s. However the cuffs certainly date it to the 1750-60s so I will stick that that as my main era.


I sewed the pattern up on the machine - as I have mentioned before, when trying a new pattern out I don't intend to waste valuable time and blood on it! The pattern seemed to use mainly modern techniques: the self and lining (including the sleeves) sewn up separately and then the sewn together right sides together and turn right-side out. The wrist seam allowances were turned inside and cuffs were sewn into the sleeve ends.

Cute little cuffs

Inside lacing strip

I top-stitched all the vertical seams with a dark burgundy to match the flower on the linen pattern, then purchased some self-cover buttons for the front. The pattern called for the cord to lace up around the buttons, however I must have got the wrong buttons or something as there was no way that the lacing was going to stay put. Instead, I sewed up two 3 cm strips of linen, boned both sides of the strip and inserted grommets down between them. As this was a 'practice', I hold with the same theory with hand-sewn eyelets as extensive hand sewing! This lacing strip I sewed into the front edges of the jacket and the lacing is inserted between jacket and lacing strips. The buttons are now just for show of course, but it looks smarter.


For the stomacher, the pattern designed it to be sewn up using two pieces of interlining, with boning channels sewn into them. The lining and self are then sewn to it and it's flipped right side out. Bones are inserted and it is hand-sewn shut. This leaves it nice and tidy with no visible boning channels.

Partly boned stomacher

The jacket is nice and smart, with a snug fit, and it looks fabulous with a fichu ticket in. It's not the most comfortable to wear, but possibly that was the fault of my 21st century sense of comfort! It looks very smart with the pink petticoat and a bumroll. I imagine it would suit a woman who is the wife of a store owner or captain of a ship, and she would wear it while out buying from the markets or visiting her sister in the morning.


Just for interests' sake:
Cost of Jacket
Pattern: $35
1m upholstery/curtain linen: $0
1m medium weight pink linen: $0
Poly thread: $0
Self-cover buttons x10: $7
Boning x4: $.75

TOTAL: NZD$42.75

Thursday, 1 June 2017

1700-1800 Men's Shirt


Pure White Linen
This is the point that I love.

Nothing has gone wrong, nothing is cut too short or puckered or shrunk unevenly or accidentally the wrong way around.

The bubble has not been burst.

After finishing what I considered to be a complete 18th century woman's costume, I was on to making a man's costume next. In this instance, everything went according to plan, mostly because I had already made all the mistakes with a practice shirt. So here is how I made my first linen men's shirt.

Men's 18th Century Linen Shirt and Stock

Before I begin, I'll give my husband credit: My husband is the best husband in the world. Sorry ladies. It's true. He let me make him this shirt, and lets face it, he was earning BIG brownie points. My husband is a gardener. He has no interest in historical clothing, nor dressing it in. He runs up and down mountains and does marathons and goes to the gym at 5:30am...he is not, however, like many of the delightful spouses I see on blog who allow themselves to be costumified. So yay Mr Persson. You are a saint.

I used this pattern, which I found good (I'll review it in my Pattern Review page). I had to decide on sizing for my own 6'1" 87kg man, as well as the fact that nowadays linen is usually 140cm wide, not the narrow width described in the pattern. The point of the pattern is to minimise waste, so this is what I came up with. You could find a better way, even cutting it across the width and sewing up shoulder seam, which in all honesty will only be about 5-10cm long! I made the cuffs and collar slightly wider than the pattern recommended, as it seemed nicer to my eye. That may be historically incorrect, but as this shirt pattern hardly changed in 200 years, I'm sure I can find a period in which cuffs and collars were wider!


  • Light-mid-weight linen, 2.2m
  • Linen thread


Cut:

  • 1 main body @ 200-220cm x 75cm approx. (measure shoulder to mid-thigh length x2) or 2 @ 1.1m and 1.2m x 75cm
  • 2 sleeves @ 65cm long x 70cm wide approx. (if cutting main body in one strip, remaining width of fabric should be about 65cm)
  • 2 underarm + 2 neck gussets 8x8cm
  • 2 shoulder pieces 18x7cm
  • 1 chest heart about 5x5cm
  • 1 collar 18cm wide x 48cm (this is neck circumference + 1cm seam allowance + 5cm)
  • 2 slit gussets 6x6cm
  • 2 cuffs 10cm wide x 25cm (this is wrist circumference + 1cm seam allowance + 2cm)


The only things to really check are:

  • Length to mid thigh
  • Circumference of wrist and neck


The basic construction is as follows:
All seams are 1cm and finished flat-felled.

Sleeves:
Insert your underarm gusset (I've included instructions here), and sew up under-arm seam from gusset to wrist, leaving 8cm open at wrist end. Double turn a narrow hem at wrist opening and stitch using a running stitch. Here's a great article with a picture of the ordering of flat felling a sleeve gusset to avoid puckering. And here is another.

Gusset inserted

Hemmed cuff opening on finished shirt

Cuff:
Fold cuff in half lengthwise, sew narrow seams with a running stitch, clip, turn, press long side seam allowances inside.
Gather the wrist end of the sleeve until it matches the finished length of the cuff (23cm in this case). I wanted quite a formal look, so pleated the wrist in this shirt. Insert this seam allowance into the cuff, and pin firmly, but be careful not to catch inside of cuff.
From the outside, sew using a whip stitch. I sew my whips straight across, one for each pleat. If gathering, just make sure that you whip in small stitches to ensure your gathers lie smoothly.

Outside - pleats whipped to cuff.

Then turn inside out, and pin the inside of cuff to pleats. Whip the cuff down, making sure that the stitches fall on the cuff side of the outside seam or they will show on the outside!

Whipped down inside of cuffs - not so neat this time

To complete your sleeves, sew on a button (I did dorset buttons, using this tutorial - they look very smart! NB I only used about 30cm or less for each, not the 2m stated! Maybe I did it wrong...) and a corresponding button-hole. One of the great tips I got is to complete each area - sleeves, cuffs, body - separately if possible as it will save you having a whole great garment on your lap, especially useful when sewing a huge dress!

Dorset button

Body:
Fold the main body in half so that the front is about 5-10cm shorter than the back. Mark the shoulder line, as well as the centre front. If you cut the body across the width, sew up the shoulder using a flat felled seam to these same dimensions - 5-10cm from shoulder edge. This will make inserting the shoulder gusset harder, unfortunately.
Cut across the shoulder line 25-30cm (larger slit=more gathers. smaller slit=wider shoulder) either side of the centre front, and then cut the chest opening 15cm down the centre front. Double fold a narrow hem (6mm) on chest opening, using a running stitch. Cut out the little heart-shaped piece of linen, fold under the seam allowances and whip to the end of the chest opening. This will strengthen this area that is prone to tearing.

Its a large heart...but he's got a big heart


Shoulder gussets:
Cut a 6cm slit lengthways into the middle of the shoulder pieces. Stitch half of the gusset into this slit, either running or backstitch, leaving the other half free to be attached to neck opening.

Here is a great photo by Marquis of the process of inserting the shoulder gussets into the shirt.

Now you will create a larger, rounder neck opening. Sew the free half of the shoulder gusset into the end of the shoulder split, RIGHT side of gusset to WRONG side of shirt. The seam will be on the outside. Flip the gusset onto the outside of the shoulder. Press the seam allowances under and whip the gusset over the top of the shoulder, thus strengthening an area which gets a lot of strain.

Gusset finished and whipped down

Collar:
Follow the same procedure as you have done with your cuffs. Fold collar in half lengthways, sew short ends. Trim, turn and press under long seam allowances. Mark the collar into quarters: this will mark shoulder centres and centre back. Gather neckline, or pleat as I have done, and then insert into the collar.
Whip down first outside, then inside of collar, securing each pleat firmly. I didn't pleat over the shoulder gussets as they were double thickness and I felt lay better that way. If you are gathering, this should be easier and you can gather the entire neckline.


Collar inserted
Shoulder gusset detail
Completed collar

Complete by sewing on 1-2 buttons and corresponding button holes.

Finish the shirt body:
Mark on the side body 30-35 cm down (I used 32cm) to show where the sleeve will sit. Mark again on the side body approx. 30cm up from the front hem, where the side slit will go to. Sew this seam between these marks, using a running stitch. Finish flat felled.
Double fold a narrow hem on the side splits, using a running stitch. I admit I didn't quite know the procedure for insert the side slits gussets, so these were folded in half to form a triangle and then stitched to the top of the side split.
Double fold a narrow hem and stitch using a running stitch.

Side split and gusset

Inserting the sleeve:
Gather (or pleat) the top of the sleeve - approximately 10cm - so that it fits into the opening left by the side seam. Pin this into the body and adjust the peats/gathers accordingly. Sew this in using a backstitch, and flat fell.

Sleeve and sleeve gusset inserted

I found the sleeve head to be messy, so cut a small facing which I stitched over the plates inside. Yes, its a 21st century idea to have neat and tidy insides, but there you go. What can I say?

Inside of shoulder pleating

Outside of shoulder pleating


And that's about it!

As always, sewing with linen is a pleasure, as is sewing with linen thread. I didn't wax it, as I'm told I ought to. Perhaps it's just a particularly course linen thread? I don't have anything to compare it to.